Article Text

Abstract
For many neurologists, lumbar puncture is the only practical procedure that they undertake on a regular basis. Although anaesthetists and emergency physicians routinely employ ultrasound to assist lumbar puncture, neurologists do not. In this article, we outline the technique that we use for an ultrasound-assisted lumbar puncture, together with the evidence base that suggests that ultrasound has significant benefits. We aim to raise awareness of a method that can make lumbar puncture more likely to succeed and to be more comfortable for the patient.
- CSF
- lumbar puncture
- ULTRASOUND
Statistics from Altmetric.com
Introduction
A lumbar puncture can often help to diagnose a neurological condition, and the procedure is regularly performed on both neurology wards and day units. However, the traditional, palpation-based technique is not always successful (particularly in obese patients), adding to patient discomfort and anxiety. A common solution is to request a fluoroscopy (X-ray)-guided lumbar puncture, but this involves extra cost as well as radiation, and it cannot usually be done at short notice.
The use of ultrasound imaging to assist lumbar puncture is not new: it was first described in 1971 by Russian authors.1 Since then, an evidence base has developed suggesting that the technique has several advantages. In addition, modern portable ultrasound equipment can be used at the bedside. Despite this, ultrasound scanning is not a routine practice in UK neurology departments, and there are few publications on this topic by neurologists in the literature. Here we describe the principles and the advantages of the method, aiming to encourage colleagues to seek a brief practical instruction and to learn this useful skill.
How to do an ultrasound-assisted lumbar puncture
The basics
We can distinguish between procedures that are ultrasound-guided and those that are ultrasound-assisted. ‘Guided’ refers to using real-time imaging to observe the passage of the needle towards and into the intrathecal space. In contrast, we use the ‘assisted’ technique, which is simpler and uses imaging prepuncture to mark the location of needle insertion (as well as to estimate its depth).
A portable, bedside ultrasound machine is used, and in the UK it is usually possible to arrange the loan of one of these at short notice from another hospital department, for example intensive care, or the medical equipment department that stores outpatient machines (figure 1). We recommend a low-frequency (2–5 MHz), curvilinear probe (transducer). This has lower resolution but deeper penetration than other options. For scanning, the patient is positioned in a conventional lumbar puncture position which can be either lateral decubitus or sitting.

A portable (bedside) ultrasound machine is used to mark the location of needle insertion before lumbar puncture.
Finding the intervertebral level
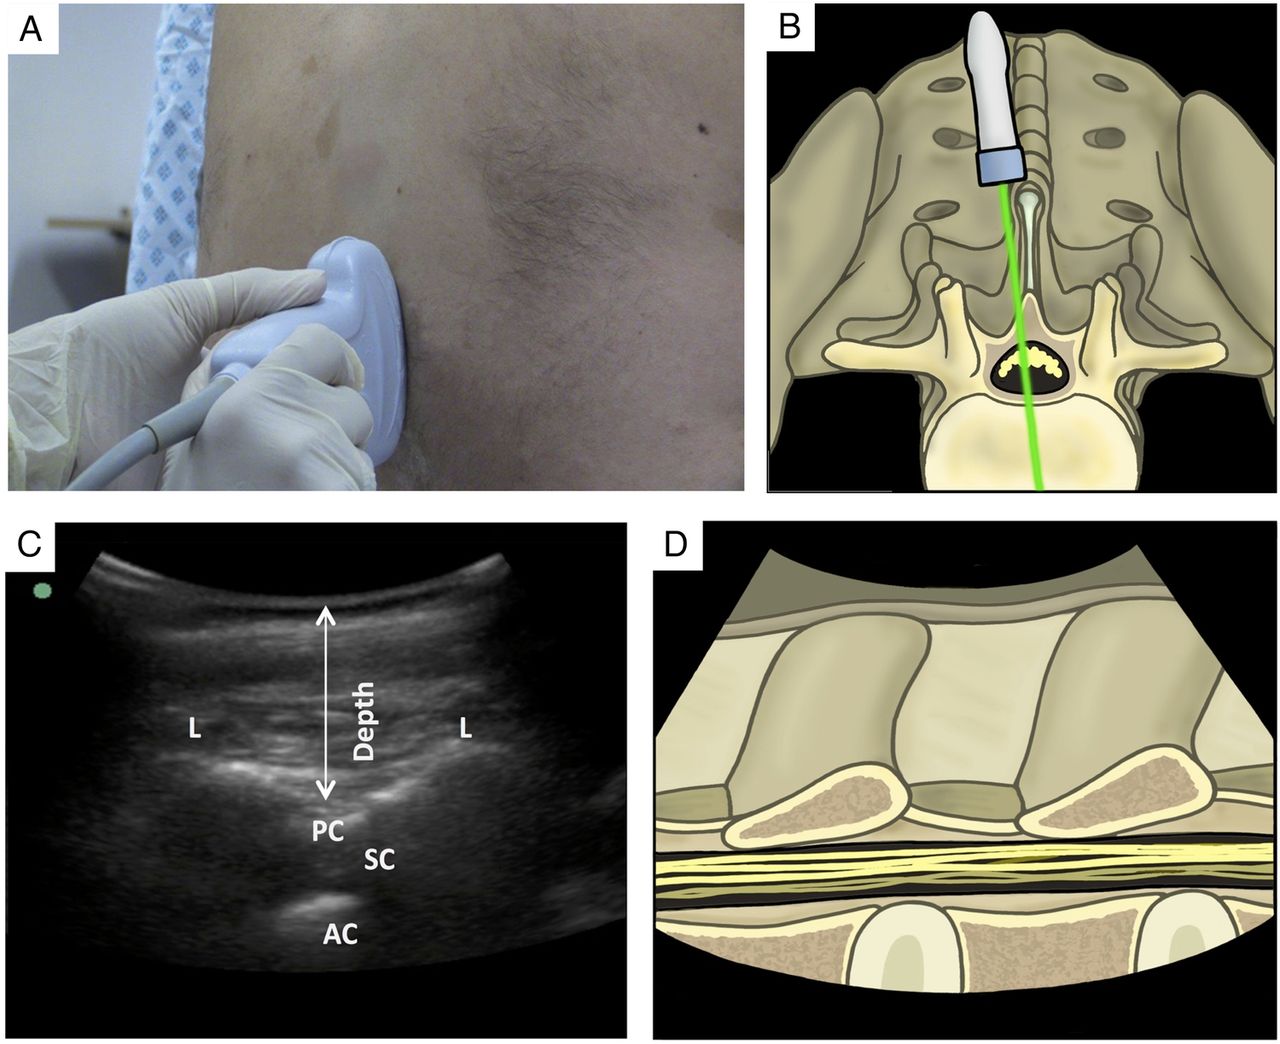
The ultrasound probe is placed on the skin, parallel to the presumed midline, in the lumbar region. It is then slowly moved medially and laterally, until the vertebral laminae are seen. This represents a paramedian view, and the laminae appear as hyperechoic humps, with posterior shadowing (figure 2). By moving the probe caudad, the examiner sees a horizontal line that represents the sacrum. The transducer is then moved cephalad, counting the humps until the midpoint of the probe is level with the 3/4 lumbar intervertebral space. The skin is marked either side of the probe and a line is drawn connecting the two points.

Using ultrasound to image the lumbar spine in a paramedian, longitudinal view. (A) A photograph of probe position on skin. (B) An illustration to show the direction of ultrasound beam. (C) The resulting ultrasound image. (D) An illustration of the anatomy corresponding to the ultrasound image. AC, anterior complex, comprising the posterior longitudinal ligament and vertebral body; L, lamina of vertebra; PC, posterior complex, comprising the ligamentum flavum and the dura mater; SC, spinal canal.
Measuring the depth
After finding the intervertebral level, the same view can then be used to measure the depth from the skin to the posterior complex (a landmark that includes the dura mater) (figure 2).
Finding the midline
The ultrasound transducer is rotated 90° and moved medially. A slow movement in cephalad and caudad directions identifies the distinct perpendicular hyperechoic hump with posterior shadowing that represents a spinous process (figure 3). With this at the midpoint of the probe, the skin is marked either side, to denote the midline. A line is drawn connecting the two points.

Using ultrasound to image the lumbar spine in a transverse view. (A) A photograph of probe position on skin. (B) An illustration to show the direction of ultrasound beam. (C) The resulting ultrasound image. (D) An illustration of the anatomy corresponding to the ultrasound image. AC, anterior complex, made up of the posterior longitudinal ligament and vertebral body; AP, articular process; IS, interspinous ligament; PC, posterior complex, made up of the ligamentum flavum and the dura mater; SC, spinal canal.
Performing the lumbar puncture
The skin is then sterilised, and the lumbar puncture is performed by the conventional technique, with the skin markings as a guide. The needle is inserted at the point of intersection of the two lines (figure 4).

The site for needle insertion is the point where the two lines intersect.
The evidence
There is a good evidence base to suggest that bedside ultrasound assistance improves the success rate of lumbar puncture. A recent large meta-analysis combined a total of 1334 patients from 14 studies (five evaluating lumbar puncture and nine evaluating epidural catheterisation). The risk of a failed procedure was reduced by ultrasound imaging, with a risk ratio of 0.21 (p<0.001) and a number needed to treat of 16. There was also a significant reduction in the number of needle insertions, needle redirections and traumatic procedures (a high cerebrospinal fluid red cell count).2
One limitation of the published assessments of ultrasound lumbar puncture is that it is difficult to achieve double blinding with a practical procedure. However, one ingenious study has overcome this by using ultraviolet ink (only visible using ultraviolet light) to mark each patient first using ultrasound and then using palpation. These patients were subsequently randomised to lumbar puncture at one of the two marks, in a double-blinded protocol. The use of ultrasound significantly reduced the number of failed procedures.3
It is easy to learn ultrasound-assisted lumbar puncture. The evidence for this comes from an observational trial with two emergency department physicians who were new to this technique. They were allowed only 10 practice scans before enrolling patients, and then reliably and rapidly obtain high-quality ultrasound images of lumbar puncture landmarks (eg, 88% of landmarks within 1 min).4
In our view, neurologists who regularly perform lumbar punctures would benefit from gaining practical instruction to learn the use of ultrasound. Even if the technique is not used on every occasion, its advantages can be applied to the more difficult procedures, to improve the chances that the patient's experience of lumbar puncture will be reassuring and comfortable.
Key points
Ultrasound assisted lumbar puncture uses ultrasound to mark the location of needle insertion on the skin and measure the depth to the prior to the lumbar puncture. A portable, bedside machine is used (2–5 MHz probe), with the patient in a conventional lumbar puncture position.
The intervertebral level is found by placing the probe parallel to the midline and moving it in caudad and cephalad directions, to visualize the vertebral laminae. The depth from the skin to the dura mater is also measured using this view.
The midline is then found by rotating the probe 90 degrees and moving it medially, until the spinous process or interspinous ligament is seen.
Lines that were drawn perpendicular to the probe in each position then intersect to form a cross that marks the location of needle insertion.
A large meta-analysis has shown that ultrasound assisted lumbar puncture reduces the risk of a failed procedure, and also reduces the number of needle insertions, needle redirections and failed procedures. There is also evidence that the technique is easy to learn.
Footnotes
Twitter Follow Modar Khalil at @modarkh and Stefan Williams at @dr_stefanw
Acknowledgement Paul Brown contributed to medical illustration work.
Competing interests None declared.
Patient consent Obtained.
Provenance and peer review Commissioned; externally peer reviewed. Reviewed by Gavin Giovannoni, London, UK.
Other content recommended for you
- Real-time ultrasound-guided low thoracic epidural catheter placement: technical consideration and fluoroscopic evaluation
- Retrodural space of Okada in the posterior ligamentous complex region: clinical and anatomical findings relevant to lumbar interlaminar epidural injection
- Ultrasound estimates of the epidural depth in the paramedian sagittal oblique and transverse median planes: the correlation between estimated and actual depth to the epidural space in children with scoliosis
- Anatomy of the lumbar interspinous ligament: findings relevant to epidural insertion using loss of resistance
- Ultrasound imaging for lumbar punctures and epidural catheterisations: systematic review and meta-analysis
- Ultrasonography versus palpation for spinal anesthesia in obese parturients undergoing cesarean delivery: a randomized controlled trial
- How to use… lumbar puncture in children
- Post-traumatic lumbar nerve root entrapment into the spinous process of the lumbar spine
- Integrating ultrasound with the combined spinal-epidural kit as a rescue technique during difficult spinal anaesthesia
- Development of a real time ultrasound guided lumbar puncture device